Mobile Experience Feature Spotlight: Client Management Capabilities
As part of our Shiraz September release, we enhanced the existing Practifi mobile experience with a few new features and updates so you can enjoy your Practifi CRM wherever you go.
In addition to a few updates to app navigation, pages, layout and branding, you’ll also find a few new functions within your client management capabilities. Now, it’s easier than ever to access client information, add new client contacts, capture interactions, manage tasks and more while you’re on-the-go.
Check out a few useful tips regarding the Practifi mobile experience client management capabilities below. Be on the look-out for our next Practifi mobile experience feature on Prospect Management coming soon!
If you’d like to learn more about how to enable your Practifi mobile experience, your Client Success Manager will be happy to help.
Your New On-The-Go Client Management Capabilities
Note: With your Practifi mobile experience, you’ll be able to view real-time client information as it exists in your Practifi desktop instance. Likewise, when you make changes in your Practifi mobile experience, your updates will be reflected in real-time back in your Practifi desktop view.
Customizable Client Lists
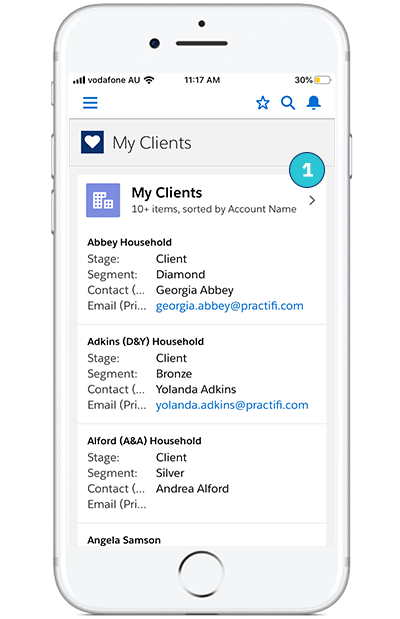
When you log-in to your Practifi mobile experience, you’ll be presented with a list of 10 of your clients. This view can be customized to fit your unique needs.
By clicking on the arrow on the right side of the My Clients tab (1), you’ll be able to access your full client list view. From there, you’ll be able to filter or sort your client list to achieve your desired view.
For example, if you wanted to quickly find all of your clients with an AUM between 500K and 1M, you’ll be able to sort accordingly.
With example we have provided, you can see that this client list is sorted alphabetically by Account Name.


Easy Navigation For Your On-The-Go Needs
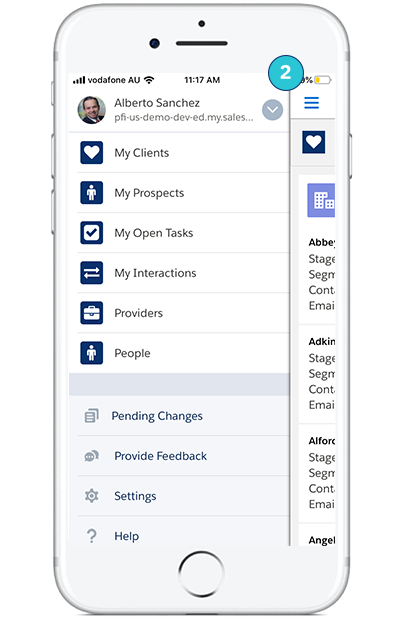
To jump around your Practifi mobile experience quickly and easily, simply click on the drop down menu icon in the top left corner (2). Here you’ll be able to easily navigate your way into your client list, prospects, your task lists, recent interactions, and additional contact records.
Quick Tip: If you find yourself logging out and back in often to check in on multiple user accounts, there’s a better solution! Save time by linking the two accounts so you can quickly swap between the two, similar to Instagram’s quick and easy account swap. Find out how by getting in touch with your Client Success Manager.
“Swipe & Click” Client List Functions
Did you know? In your full client list view, you can perform multiple actions against your client records without diving into the full client record.
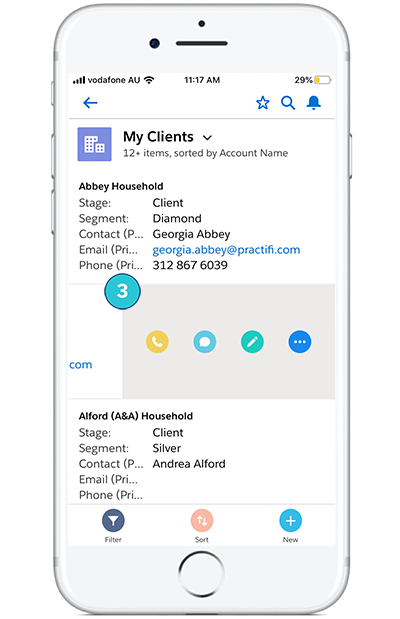
By swiping left on a respective client record in your list (3), you’ll reveal four common functions: Call, Create a post, Edit, and more. Here, you can perform each action without diving into the full client record.
For example, you can immediately phone the primary contact on record, leave a post on the client’s chatter feed, quickly edit client details such as stage or segment, and more.


Deep Dive Into Your Client Records
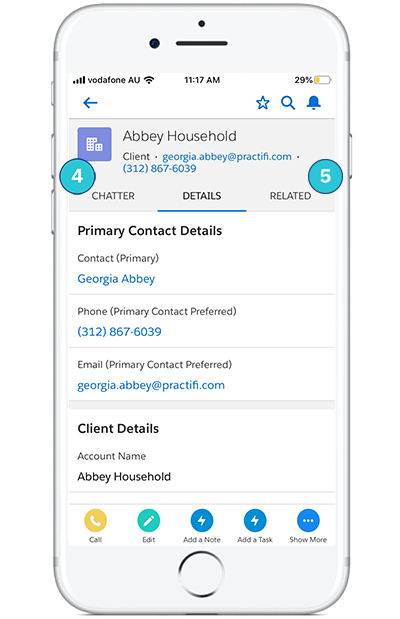
If you’d like to deep dive into your client records, you can do so by simply clicking on any client in your list.
Here, you’ll be able to view more detailed information, such as primary contact details, client details, address information and more.
If you swipe left, you’ll be able to view all chatter posts related to this client record (4) that are updated in real time. If you swipe right, you’ll be able to view all related client information (5) such as additional contacts, related tasks, client interactions, as well as relationship details.
To see all the above tips and enhancements in action, check out our short video below.


